Day 4: NumPy, pandas, and APIs
Course Outline
Monday: Intro and Coding Basics
Tuesday: Basics Continued and Control Flow
Wednesday: Functions, Modules, and NumPy
Today: Arrays, Data Analysis and APIs
Friday: Web Scraping and Text-as-Data
Review Exercise (Functions)
Write a function that, given a dictionary consisting of policies and their budgets in millions of dollars, constructs a list of the policy names with budgets below $100 million.
Use the following dictionary of policies
You Try
Write a list comprehension that takes some list of numbers, and subtracts 5 from only the numbers that are divisible by 3.
Conditional Logic in Comprehensions
Suppose we have multiple conditions we want to evaluate. In a for loop we would use if, elif and else, but the syntax is a little different for comprehensions. Check out this more complicated syntax.
policies = ["Public Transit", "Education Funding", "SNAP Expansion", "Defense Procurement", "Reduce Emissions"]
budgets  = [10,                50,                  175,              850,                   20]  # in millions of dollars

classifications = [
    f"{name}: " + (
        "small"   if budget < 25
        else "medium" if budget < 100
        else "large"
    )
    for name, budget in zip(policies, budgets)
]

print(classifications)
['Public Transit: small', 'Education Funding: medium', 'SNAP Expansion: large', 'Defense Procurement: large', 'Reduce Emissions: small']Complex Dictionary Comprehensions: setup
Same data as the conditional-logic example, just in dictionary form.
Complex Dictionary Comprehensions: the comprehension
Same conditional pattern as the list version, but name: value instead of just value. policy_budgets.items() gives us (name, budget) pairs to unpack.
Review Exercise Revisited
Write a function that, given a dictionary consisting of policies and their budgets in millions, constructs a dictionary of policies with budgets below $100 million. Use a comprehension to accomplish this!
Start with
Python Modules
Python modules are files (.py) that (mainly) contain function definitions
they allow us to organize, distribute code; to share and reuse others’ code too
- Can easily create, save and load our own custom modules
keep code coherent and self-contained
one can import modules or some functions from modules
Python Modules: The Standard Library
The standard library already contains a bunch of useful modules. For example, we can load the math module.
Instead of writing our own power function
We can import a module that has already defined this function
Another example
There are tons of useful modules in the standard library
Today's date is: 2026-07-09Here, I don’t necessarily want to import the whole datetime module, so I can instead just import date.
The standard modules come with your Python install. Colab also has many common libraries installed. Tomorrow we will cover how to install other libraries!
NumPy
NumPy is short for numerical Python. It’s a foundational package for data analysis in Python, and many packages depend on numpy arrays as a data type.
Many later libraries, like pandas, are built on the functions and data structures of NumPy. Machine learning frameworks like tensorflow also build on this infrastructure.
The most common and useful data structure in NumPy is the array. Arrays are structured objects in Python that contain data of all the same type.
Importing Libraries
numpy is not a built-in feature of Python, so we need to load it. If you don’t have it installed, type pip install numpy in your terminal.
By convention we load numpy as np.
NP arrays
numpy Arrays are useful because they are very computationally efficient ways of storing multi-dimensional data. On average, between 10x to 100x faster than other Python approaches.
Math with Arrays
Array Methods
We can check the shape of data stored in an array
Or the type of data stored in the array
More Array Methods
We can make an array of zeros with arbitrarily many dimensions like so
Or an ordered array from 0 to 19 like this
Slicing and Indexing Arrays
Like with lists, we can slice and index arrays. Let’s start with a 1D array. As with other data types, arrays are zero indexed in Python
We can update the values of arrays
Warning!
You do need to be careful with slicing arrays. Even if you save a slice of an array to a new object, NumPy still recognizes that slice as part of the original array. And if you change the values in that new object, it will also change the original object in memory.
Fixing the Copy Problem
If you want an independent copy of the slice, use .copy():
arr = np.arange(10)
arr_slice = arr[5:8].copy()

arr_slice[1] = 12345
print("slice:   ", arr_slice)
print("original:", arr)
slice: [ 5 12345 7]
original: [0 1 2 3 4 5 6 7 8 9]Now the slice is a completely separate array — changes to arr_slice don’t touch arr.
Rule of thumb: if you’ll be modifying the slice, call .copy(). If you’re only reading from it, you don’t need to.
Comparing Arrays
Multidimensional Arrays
We can create arrays of arbitrarily many dimensions, although if things are getting very complex we might want to think about other ways to store our data
array([[[ 1,  2,  3],
        [ 4,  5,  6]],

       [[ 7,  8,  9],
        [10, 11, 12]]])
Pay close attention to the placement of the brackets. Easy to mess this up!
Multidimensional Indexing
Recall this 3D array:
Each comma-separated index drills down one axis:
Multidimensional Slicing
If you want a lower dimensional slice, mix indexing and slicing
Random Number Generation
Numpy also provides us with efficient ways to generate arrays of random numbers. This is a good thing to know how to do!
Universal Functions
A universal function (or ufunc) is a NumPy function that operates on each element of an array in parallel — no Python loop required.
- Fast: the loop happens in compiled C code under the hood
- Element-wise:
np.sqrt(arr)returns an array of the same shape with the square root of every element - Broadcasts across dimensions: works on 1D, 2D, or higher-dimensional arrays without changes to your code
Analogous to how R vectorizes operations over vectors and matrices.
A Simple ufunc Example
We can make a simple 1D array of the numbers 1-10 like this
If we wanted to take the square root of every element in the array, we can do
Comparisons with Universal Functions
Suppose we wanted to compare two arrays and select the maximum value at each index.
More Universal Functions
There are a ton more universal functions, including useful utility functions like np.isnan() to check which elements have missing values
Refer to McKinney section 4.3 for a list of the most common/useful universal functions
pandas
pandas is the most popular data analysis package in Python. It is not the only option — Polars, which has syntax more similar to the tidyverse, is gaining popularity.
But pandas is still dominant. It is great for loading and cleaning data, as well as basic data analyses. Most advanced analyses packages, including machine learning packages like PyTorch and TensorFlow, build on pandas and numpy.
By convention, we import pandas as pd
Pandas Data Structures: Series
A Series is a one-dimensional array-like object containing a sequence of values of the same type and an associated array of data labels, called its index.
A basic Series might look something like this:
We can also access it in array style
Named Indices
You can give your indices meaningful labels
Will       88
Ben        75
Adam       95
Charlie    83
dtype: int64
And we can use that index label to extract specific data points
Data Alignment
If you have two Series with matching labels, any operation matches by label rather than position:
Even though Alaska and Kansas are in different positions, pandas adds the right values together. Like a SQL or tidyverse join, with the index as the key.
Naming the Index
You can also name the index to remind yourself what it represents:
Useful when you’ll later be filtering or merging — the name shows up in error messages and prints.
DataFrame
A data frame is a data object that contains an ordered, named, collection of columns. You can think of this as a dictionary of Series, each sharing the same index.
data = {'state': ['Ohio', 'Ohio', 'Ohio', 'Nevada', 'Nevada', 'Nevada'],
        'year': [2000, 2001, 2002, 2001, 2002, 2003],
        'pop': [1.5, 1.7, 3.6, 2.4, 2.9, 3.2]}
frame = pd.DataFrame(data)
frame| state | year | pop | |
|---|---|---|---|
| 0 | Ohio | 2000 | 1.5 |
| 1 | Ohio | 2001 | 1.7 |
| 2 | Ohio | 2002 | 3.6 |
| 3 | Nevada | 2001 | 2.4 |
| 4 | Nevada | 2002 | 2.9 |
| 5 | Nevada | 2003 | 3.2 |
DataFrame Methods
The head method displays only the first five rows
tail will do the same, but for the last five rows
Accessing Specific Columns
We can also look at specific columns
Creating a new Column
Suppose we want to add a turnout column. Make a Series and assign it to a new column name:
Partial Series: filling with NaN
You can also specify which index each entry corresponds to. Missing positions get NaN:
Useful when you have data for some rows but not all, and you want pandas to fill the rest in for you.
Filtering
Imagine we only want to consider cases with high turnout (above 0.5). Let’s re-append the original turnout data. Then we can take a conditional slice
Notice that the indices are retained from the original DataFrame object.
Updating Values: a common mistake
You can update values using a boolean filter — but watch your syntax:
This zeroes out every column of the matching rows, not just pop. Almost never what you want.
Updating Values: the right way
Use .loc to name which column you’re updating:
| state | year | pop | turnout | |
|---|---|---|---|---|
| 0 | Ohio | 2000 | 0.0 | 0.50 |
| 1 | Ohio | 2001 | 0.0 | 0.49 |
| 2 | Ohio | 2002 | 3.6 | 0.51 |
| 3 | Nevada | 2001 | 2.4 | 0.65 |
| 4 | Nevada | 2002 | 2.9 | 0.59 |
| 5 | Nevada | 2003 | 3.2 | 0.60 |
Same boolean filter, but only the pop column gets reassigned.
Indexing Pitfalls
When you use integers for your Series index, [-1] doesn’t mean “last element” — it tries to find the label -1:
Use .iloc for positional access
.iloc[] always uses positional indexing, regardless of what the index labels look like:
With character indices, [-1] has historically worked as positional, but pandas’s behavior has shifted across versions. Just use .iloc whenever you want positional access — it’s always unambiguous.
Summarizing Data
Sometimes it’s useful to get some descriptives about our data. We can call .describe() on a dataframe to do that.
Correlation and Covariance
If we want the correlation between two columns, we can do the following
Or a covariance matrix between three columns
Loading Data
Most of the time, we won’t be creating our own DataFrame. Instead, we will load data from some other source.
The most common data type you will see is csv, although json and xml are common if you work with text data or APIs, and in the social sciences you will see spss, sav and other bespoke types.
pandas has its own functions for reading all of these — let’s load in some data using read_csv(). I’ll demonstrate in Colab.
Read_csv()
It’s a tad different in Colab, where we don’t need to think about the file path, but in general to load data, you need to know where it lives on your machine.
Generically, it looks something like this
As a specific example, I can load
Looking at the Data
| Unnamed: 0 | ID | state | attend_online | attend_meet | buttons_signs | donate | contact_congr | registered | party | ... | act_ineq | hist_discrim | econ_mobility | tax_rich | aca | vaccines | reg_emissions | background_checks | freetrade | minwage | |
|---|---|---|---|---|---|---|---|---|---|---|---|---|---|---|---|---|---|---|---|---|---|
| 0 | 1 | 200015 | 40.0 | No | No | No | No | No | NaN | 2.0 | ... | Favor a great deal | Agree Strongly | A great deal easier | Oppose | Disapprove | Neutral | Neutral | Disapprove | Approve | Same |
| 1 | 2 | 200022 | 16.0 | Yes | Yes | No | No | No | NaN | 4.0 | ... | Neutral | Disagree Somewhat | A great deal harder | Favor | Disapprove | Neutral | Neutral | Neutral | Neutral | Raised |
| 2 | 3 | 200039 | 51.0 | No | No | Yes | Yes | Yes | NaN | NaN | ... | Favor a moderate amount | Agree Strongly | A little harder | Favor | Approve | Approve | Approve | Approve | Neutral | Raised |
| 3 | 4 | 200046 | 6.0 | No | No | No | No | No | NaN | 2.0 | ... | Favor a moderate amount | Disagree Somewhat | A great deal harder | Favor | Approve | Approve | Approve | Approve | Approve | Same |
| 4 | 5 | 200053 | 8.0 | No | No | No | No | No | NaN | 4.0 | ... | Neutral | Agree somewhat | A great deal harder | Neutral | Neutral | Disapprove | Disapprove | Approve | Disapprove | Eliminated |
5 rows × 36 columns
Describing the Data
| Unnamed: 0 | ID | state | registered | party | ft_biden | ft_trump | ft_harris | ft_pence | ft_fauci | ft_scotus | ft_congress | ft_police | ft_science | ft_blm | limit_imports | |
|---|---|---|---|---|---|---|---|---|---|---|---|---|---|---|---|---|
| count | 7453.000000 | 7453.000000 | 7051.000000 | 625.000000 | 3970.000000 | 7375.000000 | 7359.000000 | 7347.000000 | 7362.000000 | 7293.000000 | 7367.000000 | 7355.000000 | 7388.000000 | 7367.000000 | 7344.000000 | 7244.000000 |
| mean | 3727.000000 | 336416.233061 | 28.084527 | 2.352000 | 2.084635 | 53.449220 | 38.258051 | 51.896965 | 45.277234 | 67.916084 | 60.658341 | 44.346975 | 70.574851 | 79.313832 | 53.295615 | 1.444644 |
| std | 2151.640111 | 103653.120687 | 15.736841 | 0.884844 | 1.220424 | 35.814618 | 40.092051 | 37.828472 | 37.295162 | 30.240530 | 21.831983 | 21.720761 | 25.125874 | 20.167552 | 35.431626 | 0.496961 |
| min | 1.000000 | 200015.000000 | 1.000000 | 1.000000 | 1.000000 | 0.000000 | 0.000000 | 0.000000 | 0.000000 | 0.000000 | 0.000000 | 0.000000 | 0.000000 | 0.000000 | 0.000000 | 1.000000 |
| 25% | 1864.000000 | 225427.000000 | 13.000000 | 1.000000 | 1.000000 | 15.000000 | 0.000000 | 10.000000 | 5.000000 | 50.000000 | 50.000000 | 30.000000 | 60.000000 | 70.000000 | 15.000000 | 1.000000 |
| 50% | 3727.000000 | 335416.000000 | 27.000000 | 3.000000 | 2.000000 | 60.000000 | 15.000000 | 60.000000 | 50.000000 | 70.000000 | 60.000000 | 50.000000 | 70.000000 | 85.000000 | 60.000000 | 1.000000 |
| 75% | 5590.000000 | 427865.000000 | 42.000000 | 3.000000 | 4.000000 | 85.000000 | 85.000000 | 85.000000 | 85.000000 | 100.000000 | 75.000000 | 60.000000 | 85.000000 | 100.000000 | 85.000000 | 2.000000 |
| max | 7453.000000 | 535469.000000 | 56.000000 | 3.000000 | 5.000000 | 100.000000 | 100.000000 | 100.000000 | 100.000000 | 100.000000 | 100.000000 | 100.000000 | 100.000000 | 100.000000 | 100.000000 | 2.000000 |
Frequency Tables
GroupBy and Aggregation
A pattern you’ll use constantly: split your data into groups, compute something per group, recombine. The R equivalent is dplyr::group_by() |> summarise().
Aggregating Multiple Columns
| ft_biden | ft_trump | |
|---|---|---|
| party | ||
| 1.0 | 77.805263 | 10.996479 |
| 2.0 | 24.833470 | 73.347826 |
| 4.0 | 54.229102 | 34.037306 |
| 5.0 | 47.575758 | 42.575758 |
Merging DataFrames
Real analyses combine multiple datasets. pd.merge() handles this — its options mirror SQL or dplyr joins.
Inner vs Outer Joins
| state | population_m | gdp_b | |
|---|---|---|---|
| 0 | Ohio | 11.8 | 770 |
| 1 | Nevada | 3.2 | 220 |
Handling Missing Data
Missing values appear as NaN. Three useful methods:
.isna()checks which values are missing.dropna()removes rows with missing values.fillna()fills missing values with something
Dropping or Filling
String Operations: the .str accessor
When you have a column of strings, .str lets you apply string methods to every element at once. Like the string methods you saw on Day 1, but vectorized over the whole column.
More .str operations
0    False
1    False
2     True
3     True
4    False
Name: aca, dtype: bool
na=False tells pandas to treat NaN as False rather than letting it propagate.
.apply() with a lambda
Sometimes you need custom logic that no built-in method covers. .apply() runs a function on each element. Pair it with a lambda for one-off functions.
The Equivalent Without a Lambda
Lambdas are great for short logic. Named functions are better when the logic is complex or used in multiple places.
For row-wise operations (functions that depend on multiple columns), use df.apply(func, axis=1) and access row["col_name"] inside.
Basic Plotting
We can use matplotlib for all sorts of plotting in python. Analogous (but not quite as good, imo) to ggplot2 in R. I encourage you to mess around with it, using this data, on your time.
The McKinney book has a whole chapter on data visualization, which I recommend for future reading.
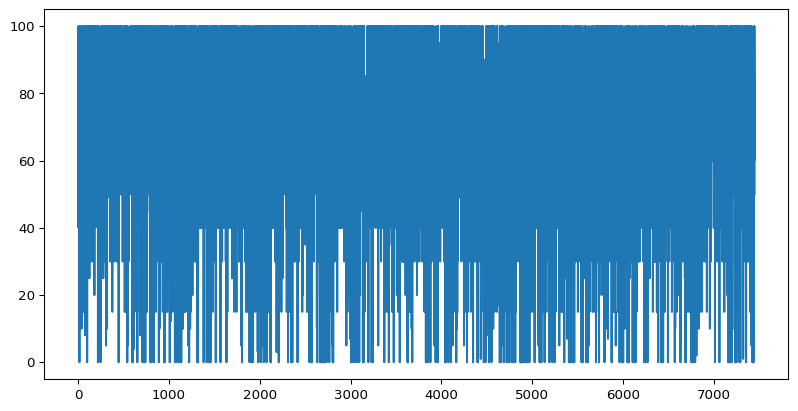
As a simple example, we can plot a histogram to see how Americans feel about the police.
Default Plots
A better Plot
(array([ 231.,  169.,   46.,  266.,  495.,  550.,  830., 1286., 1783.,
        1732.]),
 array([  0.,  10.,  20.,  30.,  40.,  50.,  60.,  70.,  80.,  90., 100.]),
 <BarContainer object of 10 artists>)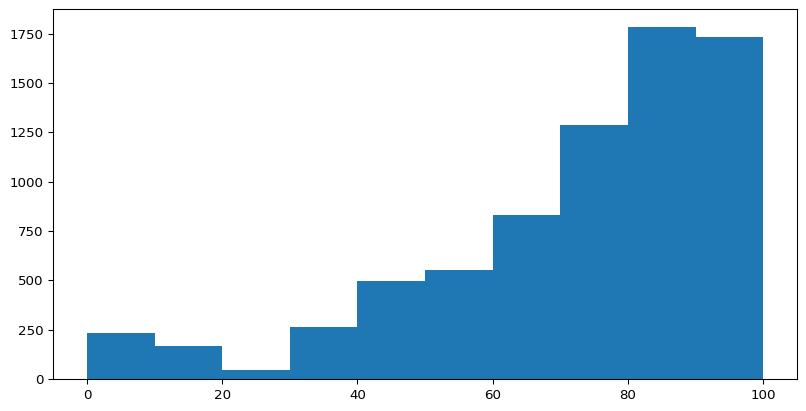
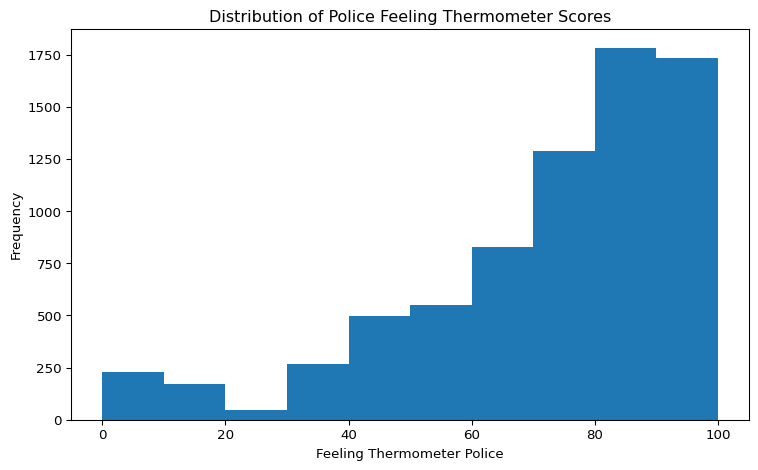
Making the Plot Nicer
We can, of course, make this plot nicer
Plotting
I find matplotlib to be kind of clunky, particularly compared to ggplot in R. Fortunately, there are some packages that build on matplotlib and improve its functionality.
I would recommend:
Seaborn makes nice plots for a wide range of statistical models, is more aesthetically pleasing
plotly is great for interactive plots (also exists in R)
An Aside - Installing Packages
Since we have been working on Colab, we haven’t needed to install any packages. This is because Colab comes with many common packages already installed (although not always up-to-date).
Still, we might want to install other packages. There are several ways to do this, and many people use package managers such as Anaconda to manage package installation.
Recommendations vary based on your machine and use case, but in general !pip install package will install a package on Colab, and then you load using import
Time for a break?
Accessing Data from the Internet
Data (e.g. web pages) lives on servers
Browsers, apps, etc. are clients
Clients send requests to servers
Servers serve the necessary files to the user
Requests library
The requests library allows us to send requests to servers. This requires us to be working on a machine connected to the internet (obviously).
Let’s see a very simple example
What’s in the Response?
What happens if you run this?
HTML Files
r.text returned the HTML code for the Python webpage, and it contains a ton of information.
style information, including links to CSS files
JavaScript scripts
HTML tags
classes, ids, toggle buttons, etc
navigation bars, sidebars, footers
Take Stock
Go to Wikipedia and load a page on a topic of your interest. What information is actually useful? What information is not worth obtaining?
We want methods for extracting useful, structured, data that we can use in analyses.
Parsing HTML Files
To parse an HTML document, we will need a parsing tool
- Software that recognizes the structure of HTML documents and allows us to extract what we want
beautifulsoupis a library that will allow us to do so- but that is a topic for tomorrow
Or, we need some other method to interact with the server and bypass this mess!
- so, let’s start with APIs
Requesting Structured Data with APIs
Why APIs?
Application Programming Interfaces (APIs) provide us access to structured data
Design is separate from content (unlike with an HTML file)
We can access the data directly
A needed detour
APIs most commonly return data in the JSON format, or occasionally in the XML format.
- Sometimes you can specify which format you prefer
To interact with APIs, we need to understand how the data that they return will be structured
- And how to manipulate it for our purposes
JSON Files
JSON (JavaScript Object Notation) files store structured data in a simple(ish) and human-readable way.
When working with API responses, we usually call .json() on the response object (e.g., r.json()) — the json module comes into play when reading/writing JSON files on disk.
Extremely popular for exchanging data with servers, storing metadata alongside data, etc.
JSON Structure
JSON files are built on two basic structures:
- A collection of
name: valuepairs (becomes a Python dict) - An ordered list of values (becomes a Python list)
Whether a JSON becomes a dict or a list depends on the top-level structure. Most real APIs return one wrapping the other.
Nested JSON
Real-world JSON often nests these:
- A list of dictionaries
- A dictionary whose values are lists
- Arbitrary combinations of the above
This flexibility is why JSON works for so many use cases — but it’s also why parsing it can sometimes feel difficult.
Example JSON
Notice that this contains a variety of data types, and some nesting. Much more free form/flexible than a .csv
Converting JSON to Python Objects
If we want to extract data into a DataFrame
APIs
APIs are a very useful way to get data. Many government agencies and other common data sources have public APIs that we can access from Python.
- Can access with R, but support for Python more robust
Sometimes you will need a key to access data, particularly if data is sensitive or non-public
Get Requests: endpoints
When we want to get data from a server, we use a get request to an endpoint — a URL that the server publishes for programmatic access.
Two examples:
- Wikipedia: https://en.wikipedia.org/w/api.php
- YouTube comments: https://www.googleapis.com/youtube/v3/channels
Get Requests: parameters
Parameters get appended to the URL with ? and &:
?param1=value1¶m2=value2&...
Example — articles containing “america”, sorted by publication date:
https://www.example.com/api/posts?query=america&sort=newest&types=articles
Possible parameters vary by API — always check the docs.
Get Requests: response format
Most APIs return JSON. Some return XML or other formats; a few let you specify with a parameter like &format=json.
JSON is much easier to work with in Python — if you have the choice, take it.
Finding parameters: the API Sandbox
Reading the Wikipedia API docs is rough. There are hundreds of modules, no obvious entry point.
The API Sandbox can help us out:
https://en.wikipedia.org/wiki/Special:ApiSandbox
- Click together a query in the UI
- See the raw JSON response immediately
- Copy the generated URL or parameter dict into your code
Realistic Workflow: find a sandbox or find a working example on Stack Overflow, or ask ChatGPT/Claude.
Your Turn!
Using the API Sandbox at https://en.wikipedia.org/wiki/Special:ApiSandbox:
- Set action to
query - Set titles to
Jimmy Carter - Under prop, find and select
langlinkscount - Set format to
json - Hit “Make request” — look at the response
Then translate that into a requests.get() call in Python. We’ll do it together on the next slide.
Parameters example
Using requests with a params dict is more readable than typing out the full URL, and avoids formatting mistakes.
import requests

endpoint = "https://en.wikipedia.org/w/api.php"

headers = {"User-Agent": "ICPSR-Python-Course/1.0 (your_email@example.com)"}

parameters = {
    "action": "query",
    "titles": "Jimmy_Carter",
    "prop":   "langlinkscount",
    "format": "json",
}

r = requests.get(endpoint, params=parameters, headers=headers)
r.status_code  # 200 is good. 4xx is your problem; 5xx is theirs.
When the API says no: User-Agent
Notice the headers argument. Wikipedia (and many other APIs) reject requests that use the default python-requests/X.Y.Z user agent — too many abusive scripts hide behind it.
- Their etiquette policy asks for a descriptive UA with a contact
- Without it, you get a
403 Forbiddenbefore the API even processes the query - This is a real-world API lesson: rules change over time. I didn’t need the User-Agent argument last year!
If you get a 403, check the API’s user-agent and rate-limit policies before debugging your code further.
Convert the response to a Python dict
The structure of d mirrors the JSON. Now we just walk in to grab the value we want.
Drilling in
Your Turn — page views
Modify the parameters to request page views instead of language link count, and extract the data.
Pagination: the continue token
APIs limit how much data a single query returns. When there’s more to fetch, the response includes a continue key telling you where to pick up.
We’ll grab one batch first, see what comes back, then loop in the next slide.
Setting up the query
The first batch
If data has a "continue" key, there’s more to fetch.
A while loop to pull all batches
all_members = []

while True:
    resp = requests.get(API_URL, params=params)
    resp.raise_for_status()
    data = resp.json()

    batch = data["query"]["categorymembers"]
    all_members.extend(batch)
    print(f"Fetched {len(batch)} (total: {len(all_members)})")

    if "continue" in data:
        params.update(data["continue"])
    else:
        break

print(f"Done! Total: {len(all_members)}")
How the loop works
- Each pass fetches one batch and appends it to
all_members - If
data["continue"]exists, merge those parameters intoparamsand loop again — Wikipedia tells us where to resume via that field - When
data["continue"]is gone,breakexits the loop
Pulling From Multiple Pages
API Keys: don’t paste them in your script
Many APIs (FRED, Census, OpenSecrets, OpenAI, …) require a personal API key to access data.
- Pasting a key directly into your code is fine for a 30-second demo
- But your notebook auto-saves to Drive — the key goes with it
- If you ever share or commit the notebook, your key leaks
- Public GitHub repos get scraped for keys within minutes
We need a way to use the key without it appearing in the notebook.
Colab: use Secrets
Click the key icon in the left sidebar. Add a new secret — name it FRED_API_KEY, paste the key as the value, and toggle notebook access.
The key never appears in the notebook. If you share the notebook, the recipient sees userdata.get("FRED_API_KEY") and has to set up their own secret to run it.
On your own machine
Two common approaches:
- Environment variables — set
FRED_API_KEY=...in your shell, read withos.environ - A
.envfile — store keys in a file, load withpython-dotenv
Either way, add .env and any key files to .gitignore so they never get committed.
Local example with python-dotenv
In a file called .env (next to your script):
FRED_API_KEY=abc123...Then in Python:
os.environ["..."] raises a clear KeyError if the variable isn’t set, so you find out immediately if your setup is wrong.
If you accidentally commit a key
It happens. Step-by-step fix:
- Rotate the key first — revoke the old one in the API provider’s dashboard, generate a new one
- Don’t just delete the line and re-commit — the key is still in git history
- Either rewrite history (
git filter-repo) or accept the key needs to stay revoked
Treat any leaked key as compromised forever. Depending on the API, an unrevoked key can mean unauthorized charges to your account, permanent API bans, or professional consequences if it was tied to work.
A second API: FRED
FRED (Federal Reserve Economic Data) is one of the most useful APIs for economic data. Register for a free key at https://fred.stlouisfed.org/docs/api/api_key.html.
Same pattern as Wikipedia: endpoint, params dict, parse JSON, convert to DataFrame.
FRED to DataFrame
pd.to_datetime and pd.to_numeric convert the string columns FRED returns into proper datetime and numeric types — much easier to plot or aggregate. Whenever an API returns dates as strings, this is the first thing to do.
Tomorrow
Tomorrow — Web scraping with BeautifulSoup, plus text-as-data basics
Questions: come to office hours (10 AM – 12 PM daily), or email me
Recommended reading: links to web-scraping and text-as-data resources will be posted on Canvas
Slides will be posted after class on Canvas and at will-horne.github.io/icpsr-2026